Drawing Background & Foreground Images
In the Drawing Text tutorial, all the text was written to a black background. Unless your entire game development is going to revolve around text adventures, it would be extremely helpful to know how to display images on the foreground and background.
To do this we’ll need to reference two header files. The first is the <genesis.h> and the <resources.h>. The code should look like the following:

There will be a summary at the bottom of this lesson that gives a summary of what each element in the code represents and its respective purpose. For now, we’re going to move on to choosing the images we want to use for the foreground and background.
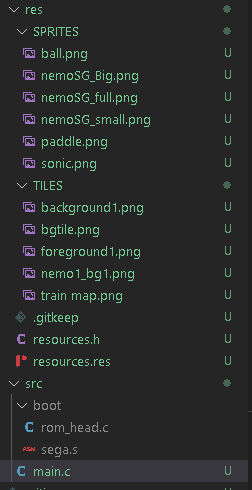
Looking at the code, you’ll notice that there are different folders. The “src” folder is where the main.c file is located that contains our C-programming language code. Above this is a folder titled “res” which I’m sure you have guessed stands for “resources”.
Inside this folder are two sub-folders: Sprites and Tiles. Too keep things orderly, we’ve placed our tilemap resourecs in the Tiles folder and things such as character sprites in the Sprites folder.
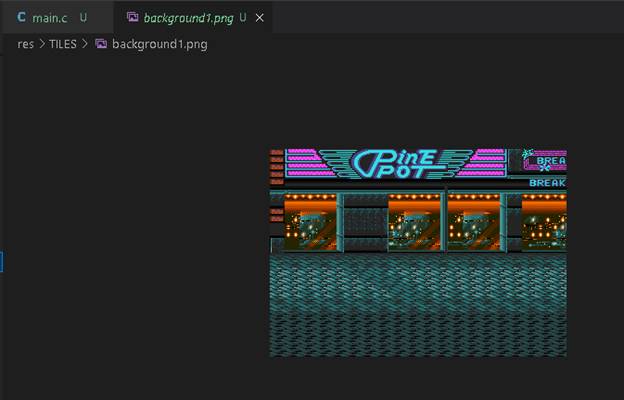
First, let us look at the two images we’re going to use for the background and the foreground. Our background image and foreground image have the creative names of background1.png and foreground1.png.
Background image
Foreground image

Next, you will see a file called resources.res. It is in
this file that we’re going to declare the resources we’re going to use. Type out the code that you see here in this
image and then we’ll go over what it means.

Declaring resources follows a certain structure. As we declare more resource types, you’ll see that the structure will vary depending upon the resource type you’re declaring. In general, the structure looks like this.
[RESOURCE_TYPE] [RESOURCE_NAME] [FILENAME] [OPTIONS...]
Our resource type in this example is IMAGE for both the background and foreground.
We then label the resource via a resource name. We’re keeping these names short and sweet by using “bg1” and “fg1” for our background and foreground.
Next, we need to point to the files via the filename. These filenames are placed in quotation marks. Originally, I was placing all my files directly into the root of the res folder. However, this can cause things to be a bit cluttered. Therefore, I’ve structured my res folder to look identical to what you would see on the OHSAT Games MEGAPONG tutorial.
The resource filenames are structured as the following:
[resource folder] \ [resource file name] [.] [file extension]
Finally, we have the options for processing/rendering/compression. Some of the options you have available within SGDK are BEST, NONE, and FAST. We’ll take a more in-depth look at what all is involved with the resources.res file in a separate lesson but we’re focusing specifically on the IMAGE type.
Not that it’s important but as you modify the resources.res file you’ll see entries made in the resources.h file as well.

Once we have our resources referenced properly in the resources.res file, it’s time to call them in the code. Before that, we’re going to add a line above the main() function. That line is the following:
u16 ind = TILE_USER_INDEX;

With the C-programming language, we declare our variables and functions prior to calling them in the main() function. It’s not that important to know what the Tile User Index is but in case you’re curious it’s the reference point used by SGDK to point to specific index values for tile-based graphics of the Genesis/Mega Drive.
It’s within the main() function that we’re going to call our graphics that need to be loaded when the screen is first drawn with images and text. There are different tastes in regards to organization. Personally, I prefer to define what text and/or images the VDP (Video Display Processor) will use and then assigned PAL values to color palettes that will be used by the assets in the game.
Initially, it may be better to write your code like this.
VDP_drawImageEx(BG_B…)
Ind +=bg1.tileset->numTile;
PAL_setPalette(PAL0…)
VDP_drawImageEx(BG_A…)
Ind +=fg1.tileset->numTile;
PAL_setPalette(PAL1,…)
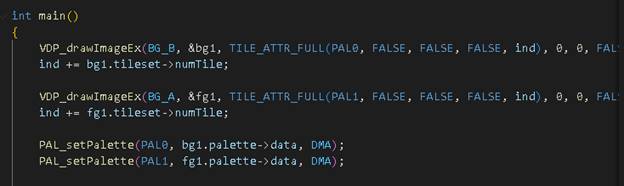
Why write it this way? The answer is that a background image is typically assigned to plane BG_B and is often given the palette assignment of PAL0 (palette no. zero). The foreground is drawn on top of the background image and is typically assigned to plane BG_A and is often assigned PAL1 (palette no. 1). Therefore, it may be easier for the coder to remember to keep code referencing PAL0 together and code referencing PAL1 together. You can write your code using the format of keeping the format we just covered but later rearrange the code to look as it does in the image above later. Do whatever makes the most logical sense to you.
Lets examine the code for the background more in-depth as the logic for this code will also apply to the foreground code as well.
VDP_drawImageEx(BG_B, &bg1, TILE_ATTR_FULL(PAL0, FALSE, FALSE, FALSE, ind), 0, 0, FALSE, TRUE);
ind += bg1.tileset->numTile;
PAL_setPalette(PAL0, bg1.palette->data, DMA);
First, we’re going to look at the parameters regarding the VDP_drawImageEX() function by hovering the mouse over the text of this function. It should bring up a callout window that defines/summarizes what this function does.
bool VDP_drawImageEx(VDPPlane plane, const Image *image, u16 basetile, u16 x, u16 y, bool loadpal, bool dma)
Draw Image in specified background plane and at given position.
Parameters:
plane – Plane where we want to load tilemap.
Accepted values are: - BG_A - BG_B - WINDOW
image – Image structure to draw. The Image is unpacked "on the
fly" if needed (require some memory).
basetile – Base tile attributes data (see
TILE_ATTR_FULL() macro).
x – Plane X position (in tile).
y – Plane Y position (in tile).
loadpal – Load the bitmap palette information
when non zero (can be TRUE or FALSE)
dma – use DMA
Returns:
FALSE if there is not enough memory to unpack the specified Image (only if
image was packed).
Load the image tiles data in VRAM and display it at specified plane position.
What this function does is define the plane we’re going to put the image, reference the name we assigned to the image in resources.res, and then use the TILE_ATTR_FULL() function to provide attributes to the image that the VDP chip can reference. This TILE_ATTR_FULL function starts by assigning a color palette to use for this image, state which attributes you want to assign the image regarding a horizontal and vertical flip of the image, and finally if it will take priority or not. Think of priority as you right-clicking on an image on your PC and choosing to either move the image to the front or send it to the back.
After we’ve used these TRUE/FALSE statements to assign attributes to the image, the function wants to be assigned fundamental tile attributes. The use of ind, which we declared above the main() function earlier, is a simple way to indicate that we want to use the TILE_USER_INDEX. Finally, we give (X,Y) coordinates on where to start drawing the image, give pointer data to the assigned palette, and determine which memory method we want to access the image. In this case (and in many cases) we use DMA or Direct Memory Access.
It's not crucial to know the fine details of what all this gobbledygook means at this point. For now, just focus on making sure you’re coding in a format that makes sense to you and that you have a rough idea of what you’re attempting to accomplish with these functions.
ind += bg1.tileset->numTile;
This is simply pointer data information that SGDK requires to ensure that your image is pointing to the correct tileset and tile index. Your tilesets will have anywhere from 1 to 15 colors and those colors will need a numerical assignment. In this instance, we’re telling the bg1 tileset that’s associated with the image background1.png to reference all the index numbers associate with the colors in that specific tileset.
PAL_setPalette(PAL0, bg1.palette->data, DMA);
This last task is to assign palette pointer information specifically for the background1.png image using this PAL_setPalette() function so that the CRAM (color RAM) can use it.
As we stated earlier, backgrounds typically get assigned to background plane BG_B but are also given the palette assignment of PAL0. Why? Not that it will make sense to you now, but the first two tile index colors are used for shadow and highlight effects. The first indexed tile in PAL0 is usually the color assigned to a transparent tile color. Why does this matter? If we were to assign a foreground image to PAL0, the first color in our color index for that tile might not appear on screen because it is being used as a transparency tile. That’s not the case for PAL1 through PAL3. FYI, the Genesis/MD only supports four color palettes on screen at once and they’re labeled PAL0, PAL1, etc.
Now, the order of operations for this function is as follows:
Parameters:
numPal – Palette number: PAL0, PAL1, PAL2 or
PAL3
pal – Source palette.
tm – Transfer method. Accepted values are: CPU -
DMA - DMA_QUEUE - DMA_QUEUE_COPY
We’ve gone into the weeds enough as it is with this tutorial. To get your feet with some experimentation, I have included some additional assets that you can try using as background and foreground objects in this lesson. Try seeing you can add these objects to the resource.res file and modify the code to draw in these new assets to the foreground and background.
My suggestion would be to start off using the back1SG1.png image as the background image and clouds.png as the foreground object. Being able to correctly compile these objects on screen will come in handy later.
That does is for our Drawing Background and Foreground Images tutorial. I realize that was a lot to take in for such little code; yet, it’s important to take things slow and try to get a solid grasp of the fundamentals of SGDK before moving on. I say this from experience…or rather inexperience. Anyway, good luck and game on!
Special thanks to the following content creators:
Eikon @ EikSoft
Pigsy's Retro Game Dev Tutorials
OHSAT Games
Code Summary
Libraries and Resources
#include <genesis.h>
#include <resources.h>
- genesis.h: Provides access to the SGDK functions and definitions for interacting with the Sega Genesis hardware.
- resources.h: Contains external asset references (images, palettes, tile sets, sounds, etc.) generated by SGDK’s resource converter tool (rescomp).
Tile Index Initialization
u16 ind = TILE_USER_INDEX;
- TILE_USER_INDEX: This is a predefined macro representing the starting index in VRAM for user tiles.
- ind: Tracks the next available tile index in VRAM to avoid overwriting tiles when loading multiple images.
Main Function: Setup and Rendering
int main()
The main game loop begins here.
Drawing Background Layer
VDP_drawImageEx(BG_B, &bg1, TILE_ATTR_FULL(PAL0, FALSE, FALSE, FALSE, ind), 0, 0, FALSE, TRUE);
ind += bg1.tileset->numTile;
- Draws bg1 image (likely defined in resources.h) to background layer B (BG_B).
- Uses palette 0 (PAL0) and tile attributes like flipping (all set to FALSE).
- Position: top-left corner (0,0).
- ind is passed as the base tile index; then updated to avoid overlap.
Drawing Foreground Layer
VDP_drawImageEx(BG_A, &fg1, TILE_ATTR_FULL(PAL1, FALSE, FALSE, FALSE, ind), 0, 0, FALSE, TRUE);
ind += fg1.tileset->numTile;
- Draws fg1 to foreground layer A (BG_A) with similar parameters.
- Uses PAL1, a separate palette from the background.
- Updates ind again after loading the image tiles.
Setting Palettes
PAL_setPalette(PAL0, bg1.palette->data, DMA);
PAL_setPalette(PAL1, fg1.palette->data, DMA);
- Loads color palettes into the Genesis’ palette memory:
- PAL0 for the background.
- PAL1 for the foreground.
- DMA enables faster memory transfer.
Main Loop
while(1)
{
SYS_doVBlankProcess();
}
- Infinite loop to keep the game running.
- SYS_doVBlankProcess() is the recommended way (for SGDK ≥ 1.60) to sync with the vertical blanking interval (VBlank) — the period when the screen isn't being drawn and is safe to update VRAM.
Commented Code
//VDP_setScreenWidth256();
//VDP_setScreenWidth320();
- These lines are commented out but suggest screen resolution can be set. 320 is default; 256 is a lower-resolution mode (faster and useful for certain effects).
Return Statement
return (0);
- Standard C main function return, though largely symbolic in an embedded context like the Sega Genesis.
Overall Summary
Your code initializes and displays two images — a background and a foreground — each with its own palette, on their respective background layers. It then enters an infinite loop to maintain the display and syncs to the VBlank. It forms the base structure for any game or graphical demo on the Genesis using SGDK.